Fix ‘No Internet Secured’ Connection Error on HP Laptop
Have you stuck in a situation when your screen displays- “No Internet Secured” connection error? Well, the error is weird on Windows PC, when your computer is connected to the internet and still you are unable to open a web page. However, don’t worry, because this daunting error has a simple solution from HP Laptop Support.
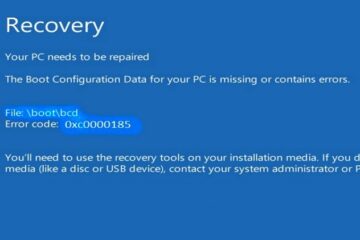
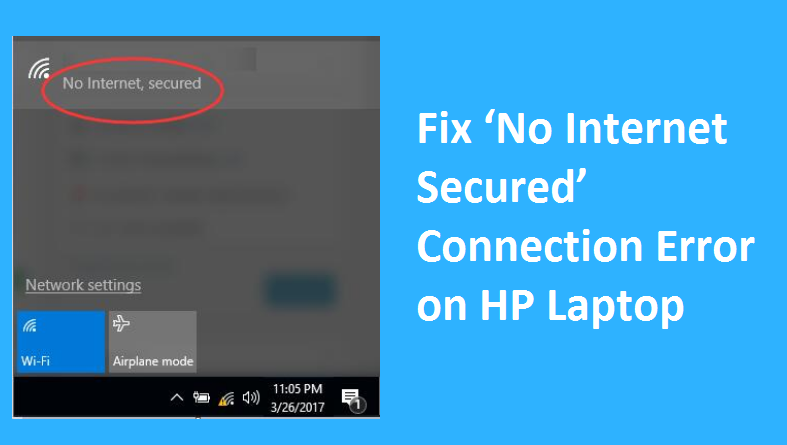
When you reconnected to the Internet through a Wi-Fi router, but unable to open any web page, first check the wireless icon in the bottom right-hand side tray. You will most likely see a small yellow triangle, and when you click on it you will see the No Internet, Secured error message. But why this error occurs? This error can come in your system because of different reasons, the most common being a change in your configuration settings like your IP address, which could cause your wireless router to generate the problems like failure in internet connection.
At times when any program in your system even including operating system gets the update, this can cause such a problem. If you are one of those who are facing this problem, then you have landed on the right page. Here on this page, you will see simple solutions to fix no internet issue.

How to fix the “No Internet Secured” problem?
To fix No Internet Secured issue, you will find many ways. It is a good idea to run through each option because they can fix the problem. It is just that, you don’t know why this problem has occurred, therefore by trying all the ways you can fix the error.
Solution 1: Change the property of your Wi-Fi connection
- Press Windows key + R key together, to open the Run command box.
- Now enter “cpl” and click OK.
- This will open the Network Connection
- Now select the WiFi connection, right-click on the WiFi and choose Properties.
- In this dialog box, make sure that you have marked the tick in front of below option:
- Client for Microsoft networks
- File and printer sharing for Microsoft networks
- Link-layer topology discovery responder
- Internet protocol version 4, or TCP/IPv4
- Link-layer topology discovery mapper I/O driver
- Internet protocol version 6, or TCP/IPv6
- Next, click on the network icon, and search for a WiFi network that is causing the error.
- Unplug any Ethernet cable if you have connected to your computer.
- Enable the airplane mode on your computer.
- Now, restart your Wi-Fi router.
- After the router is on, now disable the airplane mode on your computer.
- Next, connect to the WiFi connection again.
This time it should work, and let you access the web pages you are looking for. But if not, then try next to the solution.
Solution 2: Update the network adapter
At times, outdated drivers can prevent your computer from connecting to the Internet. Hence, to fix it, try below-mentioned steps:
- Press Windows key + R key together, to open the Run command box.
- Now type “devmgmt.msc” and press enter.
- In this window double-click on “Network adapters” to expand it.
- Now identify the network adapter that your computer is currently using, right-click on it and choose “update driver software”.
- Now, in the “update driver” dialog box, click on “search automatically” option. Your Windows will search for the update driver software.
- Open the “network and sharing center”. To open it, right-click on the network icon in your computer’s notification bar.
- Now choose the “open network and sharing center” option.
- Locate “change adapter settings” in the left-hand menu and click on it.
- Right-click on your wireless network and choose “properties”
- Now, uncheck the Internet protocol version 6 (TCP/IPv6) to disable it.
- Click OK and close the window.
- Restart your computer, and you should be able to access the internet now.
- If you can access the internet still, try uninstalling your network adapter. Follow the below steps to do that:
- Open the device manager and double-click on network adapters to expand it.
- Now, look for the network adapter you are using for the Internet connection. Right-click on it and choose “uninstall”. Through this, your network adapter will get uninstall from the computer.
- Next, you have to look for a menu item called “action”.
- Click and choose “Scan for hardware changes”. Then Windows will automatically scan and detect the network adapter. This will even install it for you.
- Now, wait for a few minutes until the installation process completes and then restart your computer.
This will fix any network adapter-related problems that you are having.
Solution 3: Modify the TCP/IP properties:
If you are unable to access the internet while using Windows 10 creators’ update or Windows 10 Fall Creators Update. Try changing the TCP/IP settings you correct this issue.
- Press the Windows key and R key on your keyboard simultaneously.
- Enter “ncpa.cpl” in the Run dialog box and click OK.
- You will be redirected to the “network connections” window.
- Now locate your Wi-Fi connection and right-click on it. Select Properties.
- Double-click Internet Protocol 4 or TCP/IPv4.
- Now select the “obtain an IP address automatically” and “obtain DNS server automatically” options.
- Next, you need to click on the “advanced” option. And go to the “WINS” tab.
- Scroll down the NetBIOS setting and choose “enable NetBios over TCP/IP” settings.
- Now choose OK on all the dialog boxes.
Select everything and wait for a few minutes. Now open the network adapter again and this time, IPv4 connectivity should be in the “Internet” state. This setting will open any web page for you.
However, if still, you are facing the “No Internet Secured” issue and
Solution 4: Change Power Management Properties
Another possible reason that could bring this error in your system is- power management settings. You will likely get this problem when you use, Windows 10 Fall Creator Update. Hence, to solve the error, you need to follow the below steps, to solve it.
- Press the Windows key and R key simultaneously.
- Select the driver manager and expand the network adapters.
- Now double-click your wireless network and go to the “power management” tab.
- Now uncheck “allow the computer to turn off this device to save power” option.
- Wait and restart your computer.
When your computer gets open again, now check if the error is resolved and you can connect to the internet now.
Solution 5: Disable Wi-Fi sharing software
In Windows 10, the router driver can have a conflict with the wireless drivers, and this can cause such error in your system. Hence try to fix the conflict, by following the below step:
- Open the network adapters, right-click on a wireless network that you are using and select Properties.
- Click on sharing tab
- Uncheck the “Microsoft network adapter multiplexor protocol” and any other item related to Wi-Fi sharing.
- Now find which items are related to the sharing, click on each item and below, you will get the description of its purpose. Based on the description, select the items you have to uncheck.
- Now close the network adapters and try connecting to the internet.
No Internet Secured is the common internet failure error that users mostly face. But with the help of the above solutions, you can easily fix it. However, if you fail to perform then you can take help from HP Support to resolve the problem.