How to Enable Virtualization (VT) on HP PC?

When running Access Commander in a virtual environment, BIOS settings must be configured on your HP PC as it allows virtualization. Accessing a computer’s BIOS will vary from manufacturer to manufacturer. Moreover, the same manufacturer may implement different BIOS versions depending on your accessing computer. Therefore, in case you are finding that VT is not running on your HP PC, then it is disabled. To Enable Virtualization (VT) on HP PC, you should contact HP Support Phone Number to get help from our deft connoisseurs. They have talent to bring VT in running state appropriately.
The users can effectively enable Virtualization technology by entering the PC BIOS or by accessing your PC BIOS for Windows. Virtualization technology should be enabled all the time because if it is not the system will slow down and taking too much time to open any file or folder. Therefore, check BIOS and change its settings if necessary.
Methods to Enable Virtualization (VT) on HP PC
Go through the below given instructions carefully so that VT will be turned-on or in active mode. Have a look at once:
Method 1: Access Your PC
First thing you should do is to access your PC by following the below written steps:
- First of all click “Start” button and then select “Settings”
- Choose “Update and Security” from the option
- Tap “Recovery” from the top-left hand
- Under “Advanced start-up”, click “Restart Now”
- Select “Troubleshoot” once the PC restarts
- Choose “Advanced” options
- Select UEFI Firmware Settings
- Click Restart to restart the system and enter UEFI (BIOS)
Method 2: Enter PC BIOS
Follow the below given steps to enter the BIOS
- If your HP PC is continuously restarting, tap Esc key to enter BIOS
- Press the F10 key on your keyboard for BIOS Setup by following the on-screen instructions
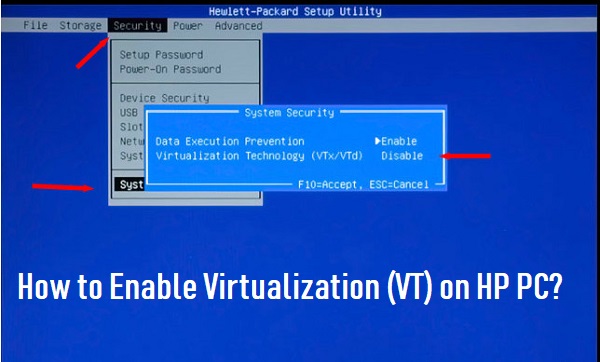
- Press the right arrow key to System Configuration tab, Select Virtualization Technology and then press the Enter key
- Select Enabled and press the Enter key
- Press the F10 key and select ‘Yes’ to confirm and press the Enter key to save the changes
- After that reboot your system
Have you gone through all those above written procedures one by one? Have you been still finding the same issue while operating on HP PC? If yes, then don’t feel blue! Just contact HP Laptop Tech Support team via dialing our 24/7 accessible helpline number. There you will get instant solution at no cost.